

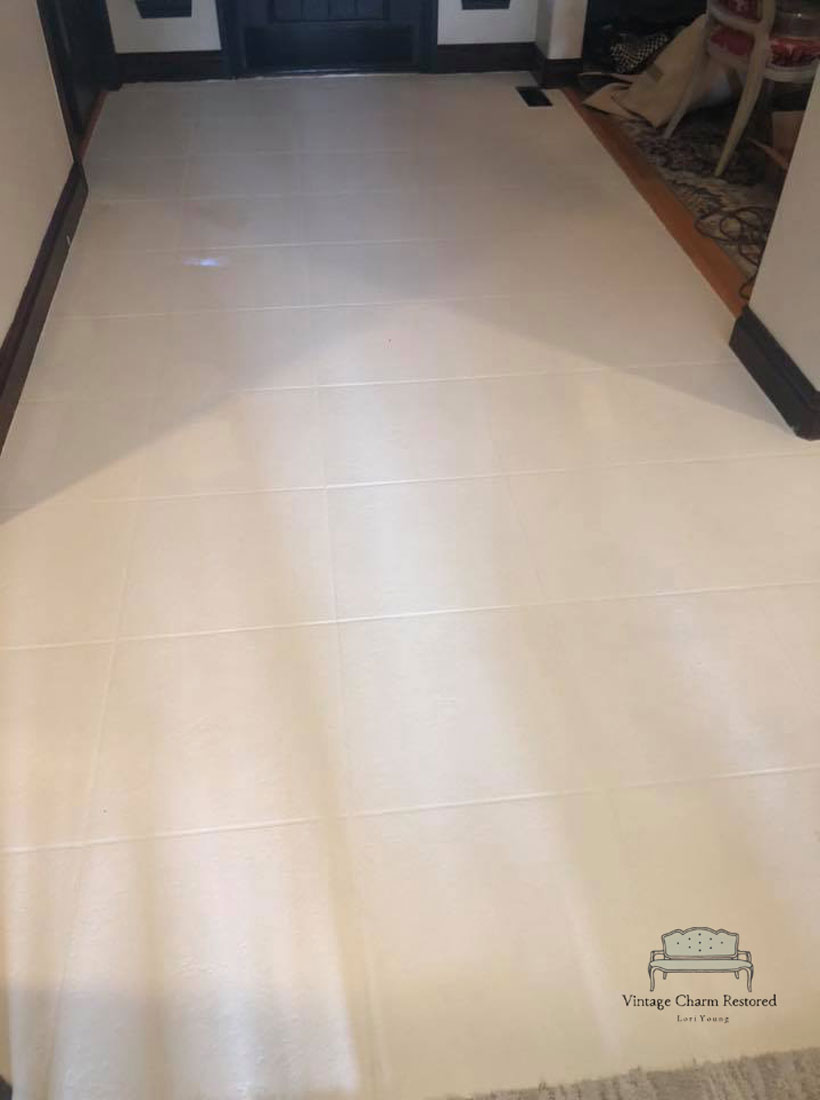
Dirty tired old tile but in great condition? Let me share with you today, my…
DIY Hand Painted Stenciled Floors- Cement Style Tiles
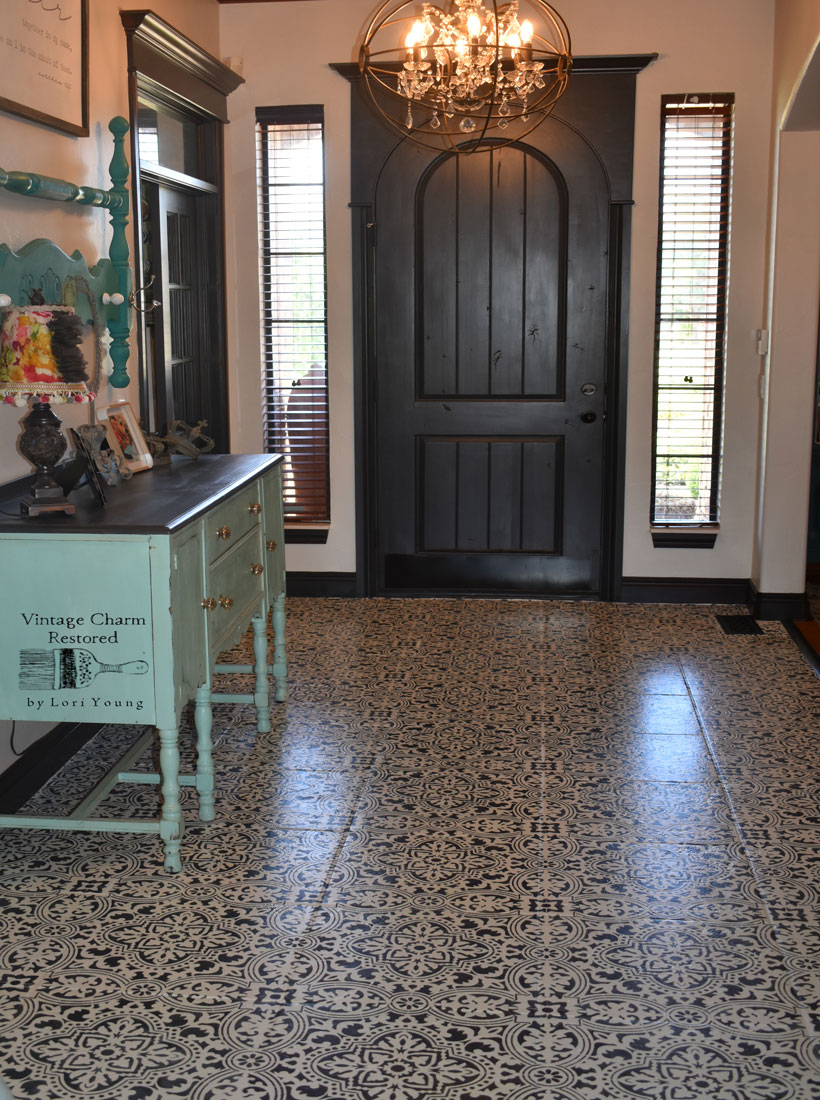
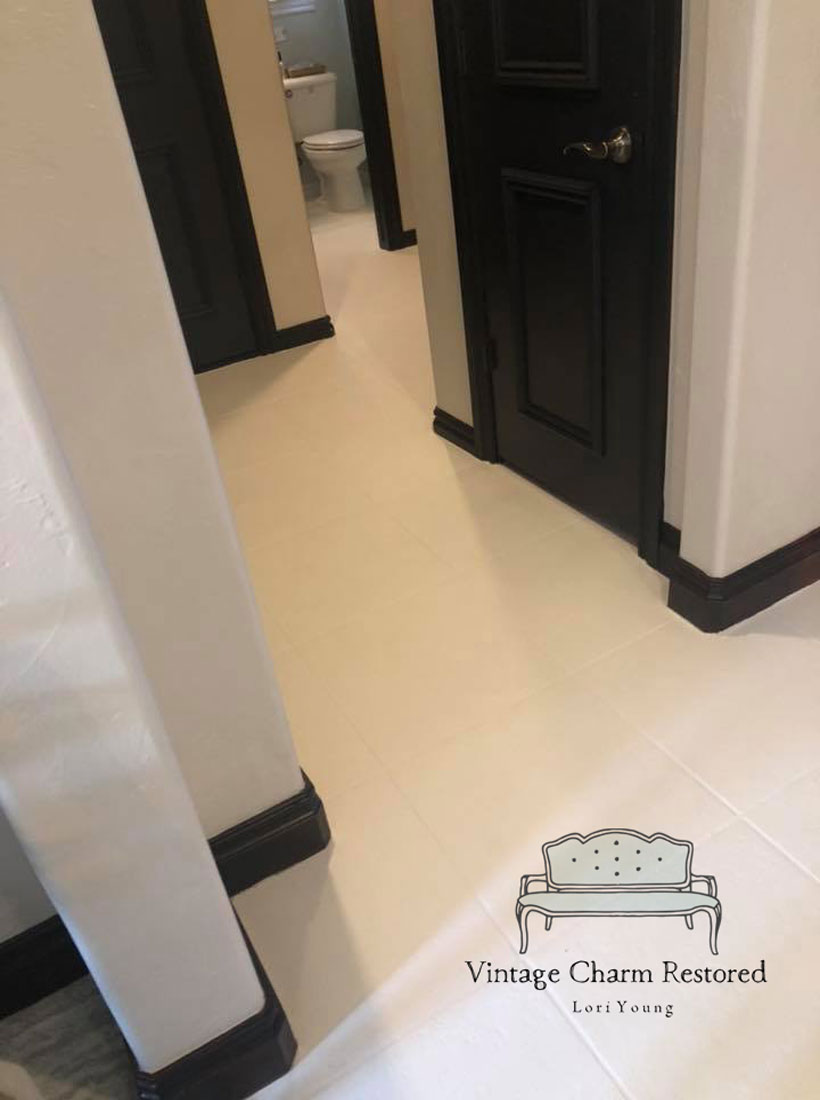
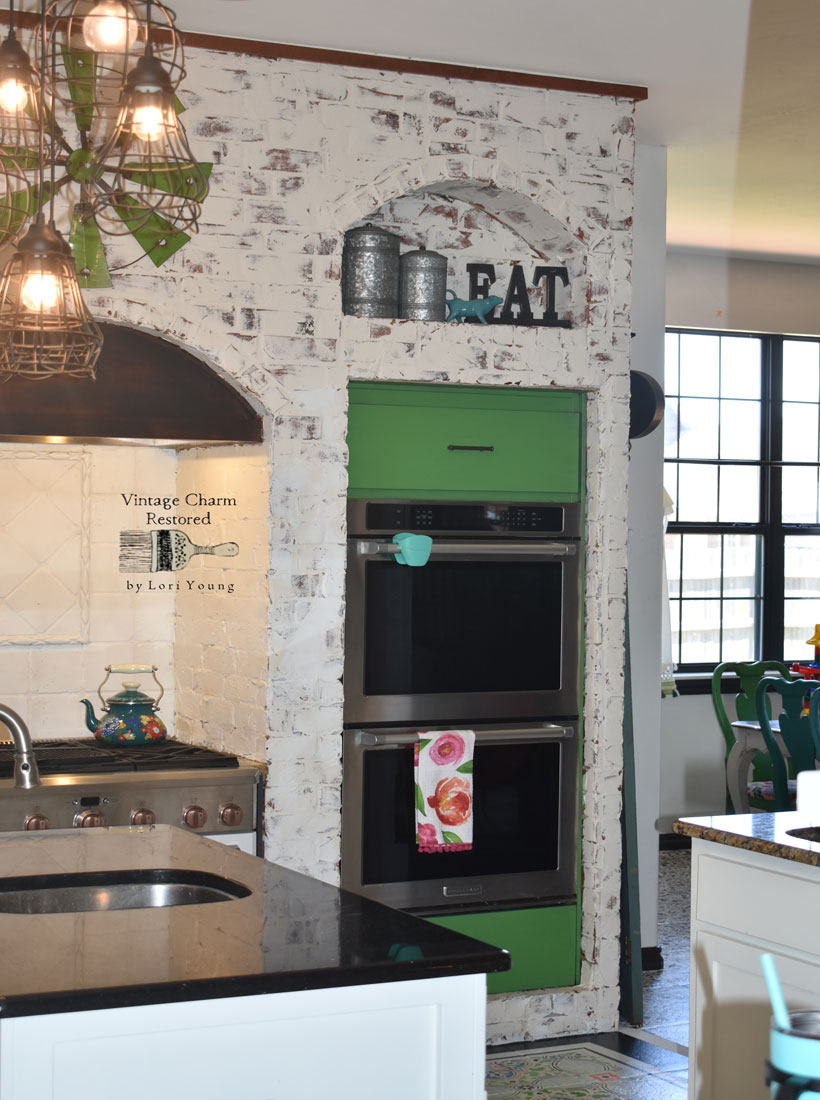
So Now, when I open the door… THESE are the first thing you see!!
This amazing floor that I poured all my loving bits of goodness into!!

Why DIY Stenciled Floors??
Well, if you search out DIY Stenciled Floors- you’ll see a variety of amazing floors that were created to mimic very pricey versions of “cement style tiles.”
I have always loved the bold look of those floors. Dreamed of having them. But we’ve always had wooden floors!!
So the moment I walked through this house, I knew my dreaming of those floors were going to become reality.
I totally ascribe to use what you have and waste less model.
Hello isn’t saving money is always a great thing?? Yes, Especially when you have a project list longer than the hubs knows about!!
I know you are asking yourself- “Does it really save you that much money, when you factor in the labor of the work involved??”
I am yelling back to you- YES!!
Is it easy NO!! IS it doable?? Yes!! Worth it?? Yes, If done well.
Is this for a novice?? I think so if you start off small.
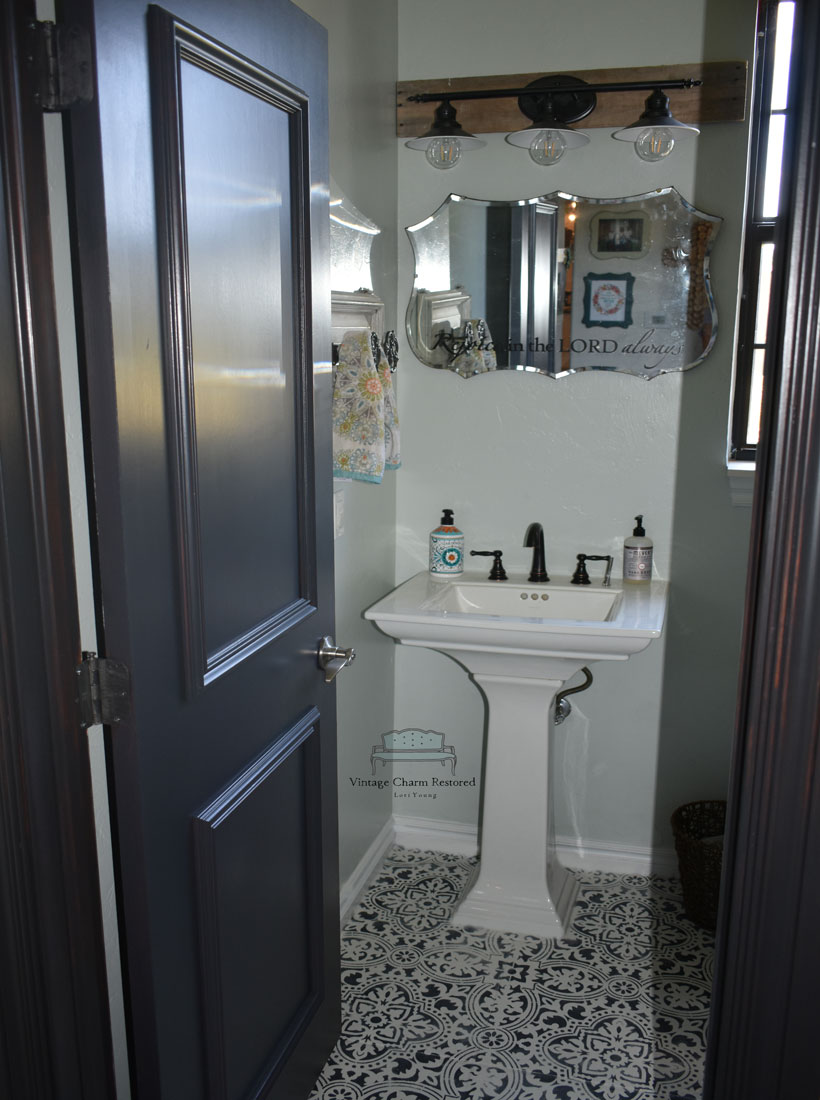
Like a bathroom. And it’s harder than you think to get around that toilet. So get it clean!!
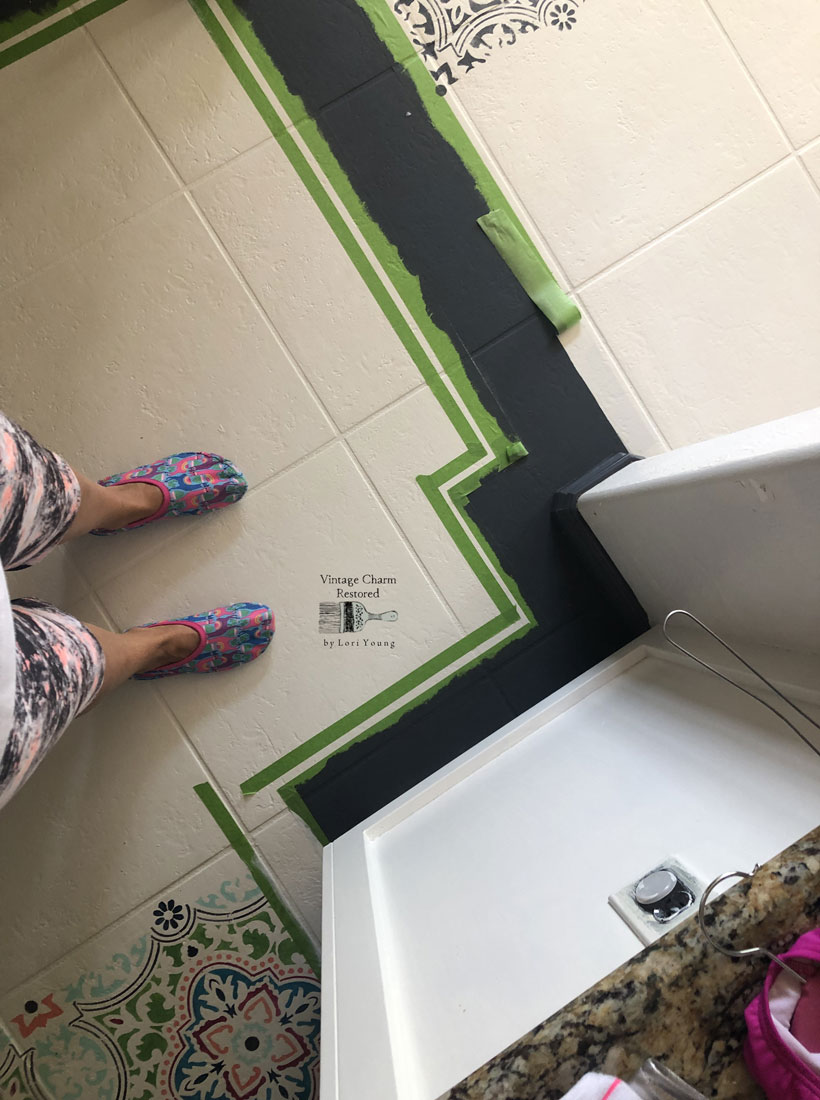
I didn’t tape in this room because I still have a wall treatment to do and it will mean change out the trim.
Cost Comparison New vs DIY
New Breakdown
Of the floors I just finished, I counted the center image in the stencil 297 times.This number doesn’t count the stencils that are edges or incomplete- so this is a very modest number but still draws the picture.
Most of the cement tiles are sold in 4in x 4 in up to a 10in x 10in at the largest. New cement style on ceramic tiles start at $12.95 and go upwards of $19.95 or higher. So, it would have taken 1188 tiles. At the lowest price for the larger tile- my floors would have cost JUST for the tiles- not demo or install labor, not materials to actually lay it, and not tax. $15,384 – I won’t go count the incomplete stencils. You see the savings.
My Cost Breakdown
DIY- I paid $ 49 for my stencil, and less than $100 for paint and adhesive, and $140 for 2 gallons of sealer. This took me week to complete- off and on between pool and carpool to football and testing for drivers license. You know all the life that happens even if you are trying to make your floors beautiful!! So, less than $300 for my floors. Y’all- ALL DAY LONG!!
Within this post, I will share links to the products. Those are affiliated links. They do not cost you anything more to buy. I simply, as a courtesy to you, have pulled it all together so that you know what I used and that I have used it in my own home. I will receive a small- and I mean small- compensation if you choose to buy these products through my links. I also have linked to previous posts for examples. All highlighted text will open in a new window. This ensures that you will not lose your place on this page. I hope this helps you in trying to get ready for your own DIY Stenciled Floors!!
I will share all the pictures and then below you asked a few questions and I have all the answers.
You can also find additional pictures detailing the process on my Instagram Highlights in the Floor Stencil button.
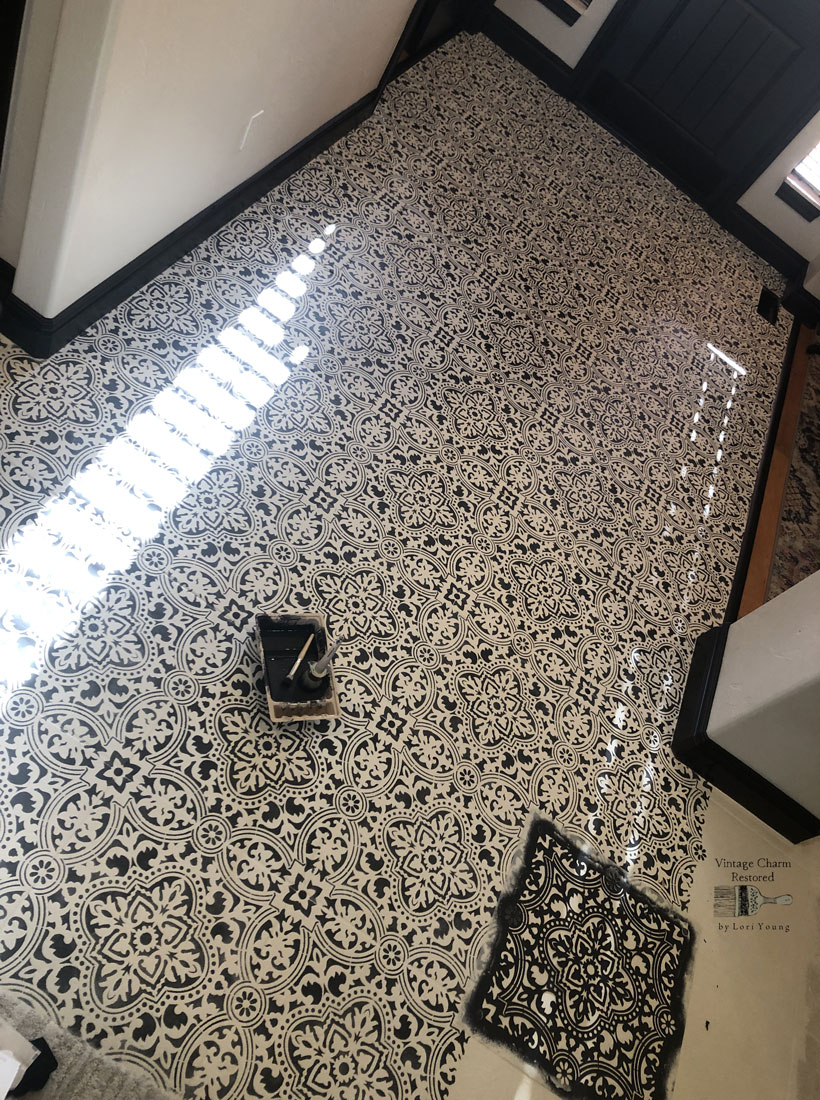
This is the beginning of the process. Fully cleaned. I painted out 3 coats of primer, 3 coats of paint in base color.
I chose to stencil the black on top of the white. There is a difference in how the pattern stands out in reverse.
Below I talk about the way you should work out from your first stenciled square.
My sweet girl getting her paint on!! She was such a great helper!!

This the beautiful floor all sealed up!!

This is the progress in the dining room area. That little pillow was much needed for my knees.
I had to work in sections with all the feet that needed to be able to get to areas that hadn’t been off limits before this room!!
Eventually that carpet is coming up and luxury vinyl is going down. Pool and carpet… Red dirt and carpet.. Not good!!


And insert the need for color…
And all the time was spent on these squares.. at least 30 minutes each.
And it was well worth it.
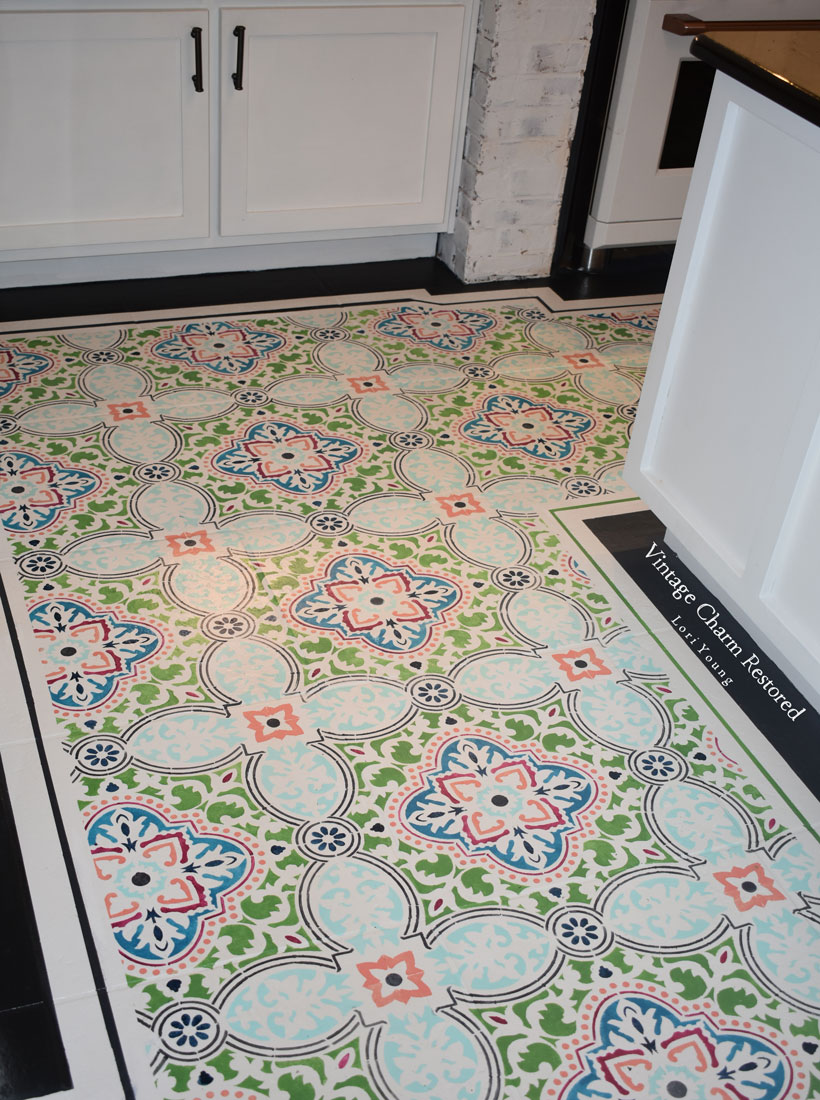
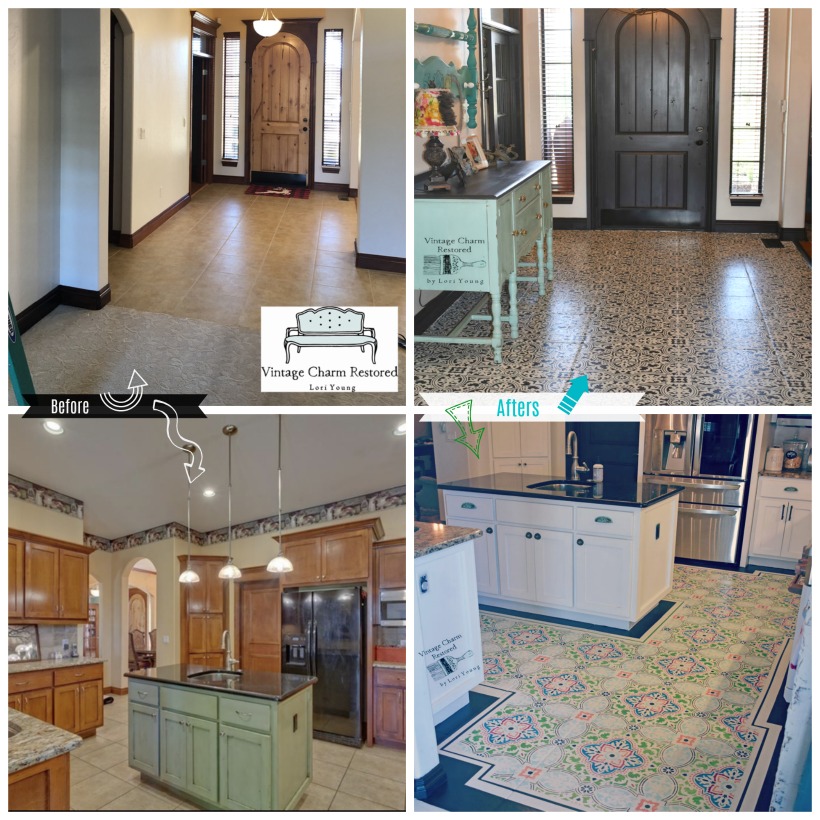
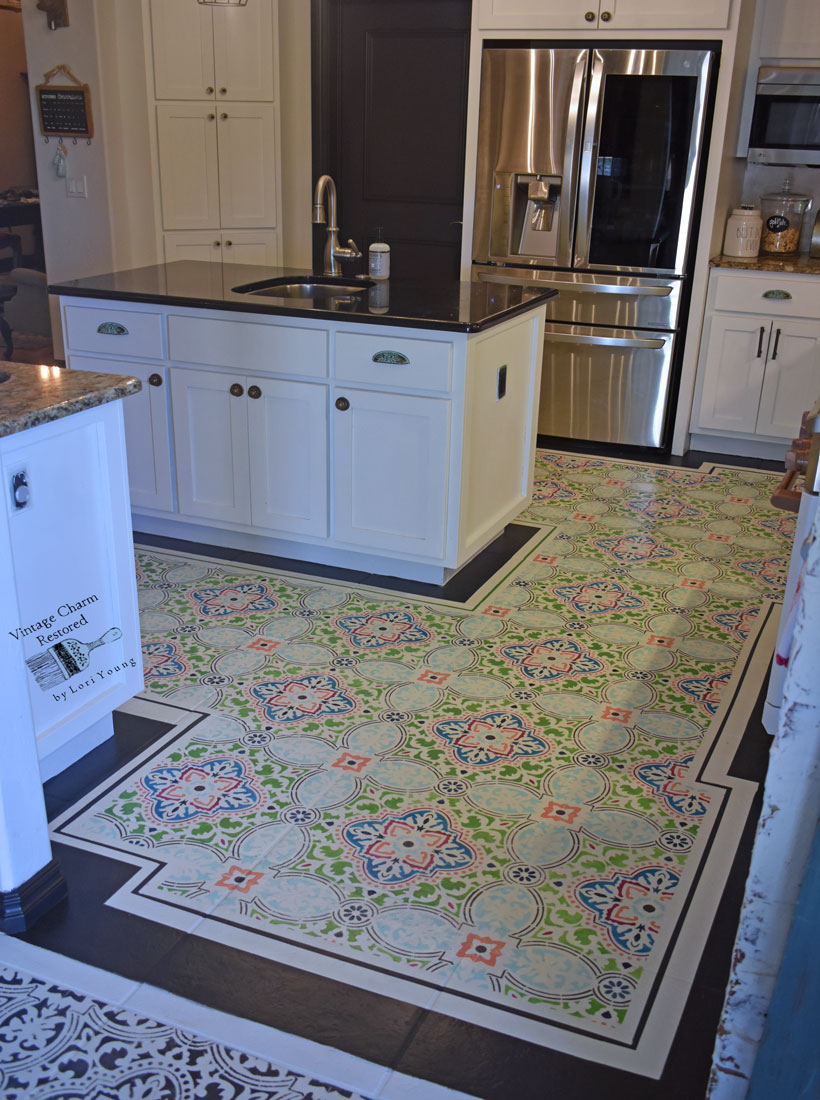
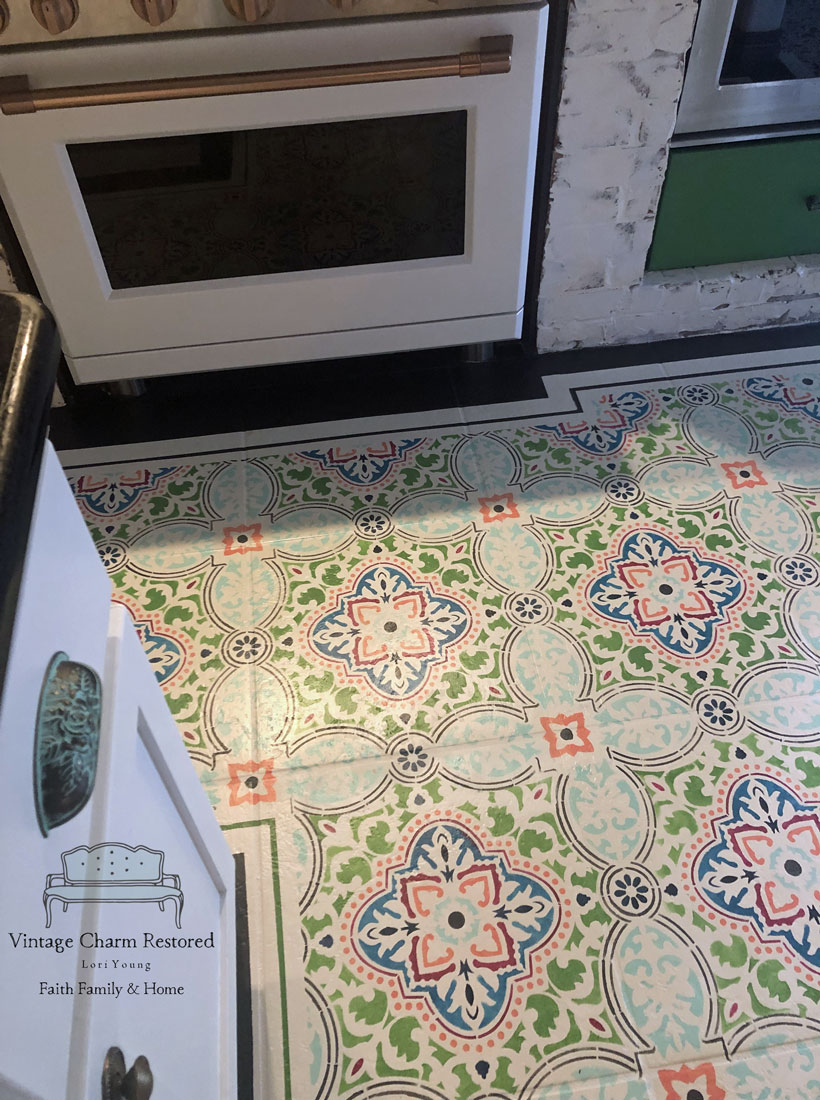
However, in this kitchen I found out my island was not centered or squared. And neither were my walls and cabinets. talk about a pattern nightmare.
Cue the tape and the need for a faux border rug type thing. Plus it helped tone down the busy of the colors and pattern!! BUT I love it!!!
Now for the Details
So as you saw above my tile floors were indeed, dirty and tired looking. Not to mention a blah brown. There were no hollow sounds and no cracks. They were stuck on well.
And as I said before, I love the look of cement tiles but I didn’t love the price of the very detailed pattern I desired.
Oh and there’s the little fact, I have taken up tile before. We redid our floors in the kitchen in our McKinney house and I wish I had thought to stencil them then!! I would have saved myself from pneumonia.
I have painted a couple of floors before. We painted out Mia’s floor in the McKinney house. I also painted out a store front concrete floor.
So, I have had some experience with floors. I also love a stencil or two or three.I’ll stop there because the list goes on and on.
And although chemo brain has been a battle- this is one thing I didn’t lose memory of.
I still wanted to research the protectant phase- I knew we would be living well and hard on these floors and they needed the absolute best prep and protectant.
In the Mastering of Preparation- We are sure to find that Opportunity and Success Will Both be Met!!” {Lori Young}
in other words… do the work of preparing on the front side…
KNOW Your Tile size and order your stencil accordingly. Some that say “large” may not be your exact dimensions so read carefully. Advice from someone who may have made that mistake a few times!!
I chose the Anatolia stencil from Royal Designs It is an allover stencil that doesn’t rely on grout lines to make the pattern. It disguises the pattern. My tiles are a 20″ x 20″ and that made finding a stencil a bit harder for me.

Another great choice would have been the Alatera from Cutting Edge.
I have created a “Floor Stencil” list in my Amazon Store for the products I used and recommend. If you are a Prime member the free shipping actually beats their occasional 20- 25% coupon.
You will want to be sure to follow these steps. BUT, it is no guarantee that life won’t happen. That your tiles are like mine… or that an occasional user error might happen.
Meaning, if something goes wrong- I am sorry but not responsible. I provide this information to you as a guide in an effort to help you create a beautiful home without breaking your budget or wasting your time on products that don’t work.
Floor Prep, Paint, & Seal Steps
PREPPING
Taking the time to fully prepare the tile for painting is one of the most important steps in the process. First, You will want to clean the floors thoroughly. DO NOT use a cleaner that has any oils or that will leave a residue. This create a barrier that will not allow the primer or paint to stick to the tile. I mention this because I typically use Thieves to clean my floor and it was absolutely NOT going to work for this process.
With that in mind, I used water and vinegar solution after I swept and vacuumed. Before cancer, I would have likely used a TSP solution and then a plain water solution to wipe away. Let it dry completely.
I didn’t sand my tiles. My tiles were about 12 years old and they were lacking any sheen from a sealer. The tiles were rough to touch already and they actually absorbed most spills. However, if you have tiles that have that glossy finish- it’s a god idea to scuff the surface with sanding. BUT you will need to again remove all debris, clean thoroughly, and let dry completely before going on to the next step.
TAPING.Friends I don’t tape. I don’t ever tape. I have a surgeons type straight line with a brush. I love the therapy of of following along the trim and floor. I just don’t like to tape. BUT if you do- hear me say this. You must seal off that edge. It’s the oldest trick in the book but it’s key. Whatever the color is under that tape that you are protecting from the new color- paint a line of it down so that if it bleeds- it’s the original color. This work on walls, furniture, whatever. I know you might have stained wood trim and that you say doesn’t work for you… Well, it does. You are going to brush a thin coat of stain or sealer across that tape… The only place that I put tape down was to create the border and lines I wanted in the kitchen. I hated every last minute of it. And if you must use tape- I do prefer the Green Frog tape!!
PRIMING
Next Step, priming. Not all primers are created equal and they have all have different purposes and curing times. I have always loved Zinnser’s Bulls Eye for painting out furniture. The Zinnser has shellac in the formula and it is great for bleed through and great with most paints. However, it’s horrible for adhesion on tile.
That slick finish was no match for my tile. My figuring this out, was a huge provision in an unwanted delay…. I had only primed my bathroom and base-coated with the paint when I found out my largest stencil was yet too small. So, it sat for a week, while I hunted down the pattern and stencil I wanted. And it also revealed that the primer wasn’t strong enough.
I was thankful I hadn’t gotten more done. I found this primer and I loved it. Kilz Adhesion has a wonderful bond immediately with the tile. It had a very low odor. It is fast drying. I only had to wait 1 hour between the coats. ***It is absolutely important that you read the time parameters for each primer and sealer that you use. These need time to cure and set before the next the layer or coat. If you do not adhere to these, you will get subpar results at the very least.
I painted on 3 coats of primer before my base-coats. Allowing to fully dry before painting on the next coat.

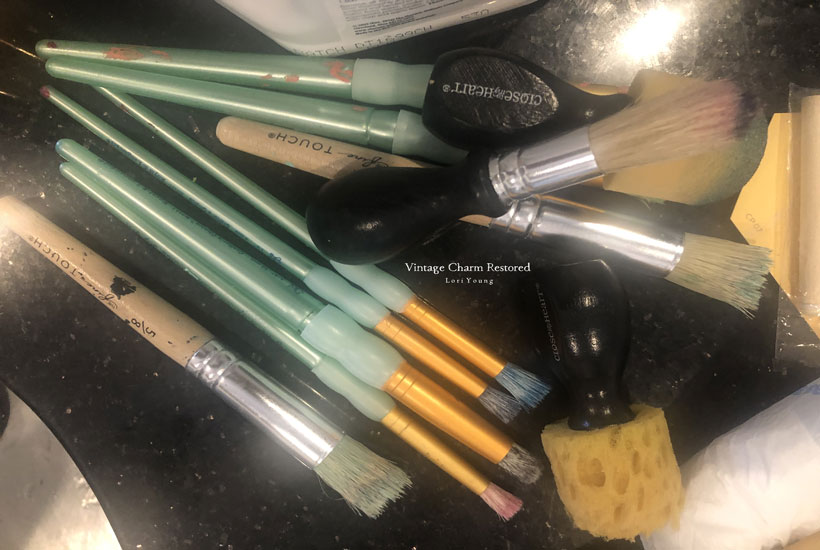
Before you the next step Prepare Your Stencil and Tools
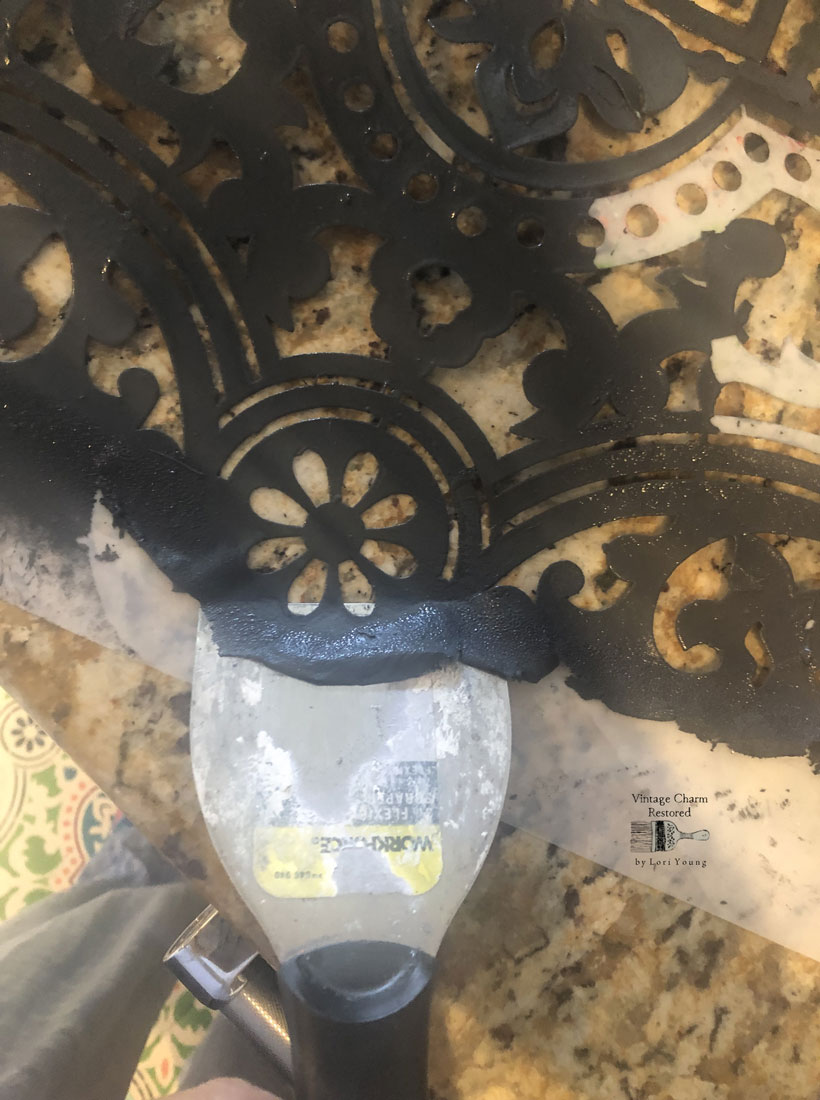
When stenciling you will want to use a stencil adhesive. I am including this because the little written about thing inside your research will be the cleaning and work it takes to keep that stencil clean and have tack on the back to get a sharp image when you pull up that stencil after you spent however long applying the paint. CRUCIAL to do this step so that you don’t have to do the never-ending touch-up game.
Both cans are $7.99 at Hobby Lobby. One is bigger- after 2 cans of the other I decided to try the bigger for savings. Well, it saved me money. But when I went to clean the front the first time it was a nightmare on the back. {{ If you have Cricut or Silhouette, a little known tip for extending the matte’s tack is to lightly mist with water. Add a ton of water to the front of the stencil and you GUM up the back of stencil with this larger can.}} I warned you.
Depending on your area- you will need more than one. Just buy it in advance- so you don’t run out. I mean who can run into Hobby Lobby for just one thing- ever??? And I have only found it at Hobby Lobby. Not Walmart, not Amazon, not not not. I was sad. And spent 3.5 hours scraping the back and peeling the gloops of adhesive… and if you don’t get it all off- it comes off on the floor of your beautiful freshly painted stencil…. Again, I warned you.
The paint no matter if you roll, or pounce will eventually find it’s way to the edges of the back- this may not mean you got a bad image this time, but it just covered your adhesive and will pull up from the weight of the paint on the front and your lines will not be as crisp. Now depending on the type of paint you use- this is a very easy clean up. So don’t try to push boundaries. It’s all a matter of working smarter, not harder. And harder is skipping steps to save time and having to do touch ups later!!
When stenciling you want to work in a square laying the first and stenciling, working to right or left- stencil that square, then down below and over to the next… this will keep your lines straight.

I used a clean wax brush to do my stenciling. My tile wasn’t a smooth finish. It was meant to resemble a tumble stone- so it had a lot of texture and unevenness. This mean that the stencil wasn’t laying completely flat all the time and the first time I used a roller, the paint went underneath a lifted spot. I used the dry roller to lightly roll over to get the stencil to stick better though. I used a variety of smaller stencil brushes when I did the kitchen floor. You will want to pounce up and down and not brush side to side- the bristles will creep under the stencil. Also, if your brushes are brand new… a little tip to lose less bristles- be rough with it before you start. Try rubbing it on your jeans/pants, between your fingers rub and flick through. Often this will get the dust out and help remove any already loose bristles. (If you choose to buy the adhesive online through Hobby Lobby via the link above.
If for some reason you find yourself off kilter- split the middle the best you can… in an all over stencil- the pattern itself hides a multitude of sins. Yes, I am perfectionist and I split the middle a couple of times. Thank you Builder for your lack of concern that someone 12 years later might want to stencil a pattern on those floors you out down against non square walls and trims… grrrr….
PAINT
Next Choosing the PAINT you will use. Friends, there are lots of tutorials out there for stenciling your floors. Some use Porch and Floor Paint, some use Garage Floor paint, some use Latex Flat, or even Chalk paint. I want to go on the record for saying this- if you prep your floors the way you need to and you seal your floors- not skimping on either of these two steps, it is completely not a debating component of what is best for the paint.
I used Sherwin Williams Flat Latex and I added in Webster’s Chalk Paint Powder. I had an old stash of the powder and mixed it into the paint. The paint has virtually no odor and the chalk powder gave it an extra bit of adhesion and durability- but also faster drying times while I was painting out over 1300 sq ft of tiles 21″ x 21″ at a time. This floor was walked on without sealer for over a week and it did pretty darn good- minus the darn OK red dirt on occassion… but scratch resistant as though it had been sealed off.
It is not too big of surprise if you have followed me for any length of time that Sherwin Williams is my favorite line of paint. It’s the color deck I take to all my clients and it’s my first choice inside my home. The Emerald (flat in this case) line is my favorite for it’s amazing texture and coverage. I used SW Aesthetic White and Cyberspace for the majority of my floors. I added a border and painted out the kitchen with a splash of color. I used color samples in- SW Refresh 6751, Talipot Palm 6726, Blue Nile 6776, Anchors Aweigh 9179, Framboise 6566, and Coral Reef 660.

Tomorrow I will share my kitchen- that post is actually written and ready to hit publish!!
Another reason that I chose this paint over garage or floor paint- is absolutely the toxicity values. I cannot do the odor nor the harsh chemicals in the others. I also wasn’t going to be able to keep my family off the floors for the required curing times on those paints. So do your homework when researching!!
Remember as you are stenciling the paint onto the basecoat, the sharp and crisp lines are a labor of love!!
Clean that stencil!!
FiNAL STEP- SEALER
Finally, it’s all done and you NEED to seal those beautiful babies up!! This step if you fail all the others… might save you. SO Please- do not skimp!!
And friends, especially you furniture painters who might sell paint and are loyal to your brands, or it works great on furniture so why not… the more coats you put doesn’t make it a better floor sealer!! Trust me!!
And just because it’s a floor finish doesn’t mean it’s a Painted Floor Finish… Are you using a white/light color on your floor?? Will the sealer AMBER?? Meaning turn YELLOW…
I absolutely read every review on every product, I remotely considered. I didn’t go for what I could walk out of the store with.
And I love me some paint department peeps at the local big boxes. BUT FRIENDS- they are not always experts on the products they sell. And I toss random questions I already know answers to- to figure out if they know anything more than pushing the buttons to mix the pigments into the bases of the paint they are selling. It is a shocking answer to that one!! Sorry!!!
So I discussed these floors of mine with my local Sherwin Williams expert. Telling him that I just beat cancer and had my second surgery, have MS and I can barely walk but I need these floors of mine to last forever…
My million dollar floors CANNOT look like a disaster because I have children and dogs.
I’m sure it was more than he thought he’d get from this girl. But it also was met with a whole new level of respect and a honest answer.
He was the BEST!! As we talked about it, he asked to see in pictures what we were protecting. He also knew what I had used because he sold it to me, this was crucial.
And you know what he said- “I don’t sell anything that matches what you found.” Not even our floor and porch sealer, not especially not the garage floor epoxy sealer I had asked about…
He said that this was the absolute best sealer for the painted floor I had painted out with his paints. He also knew the difference between the regular version of the sealer that was on the shelves and the floor formula that I had to order.
That’s the honesty you need when you are doing work with a professional. So, I am passing that along to you.
I really wanted to walk out of the store with it. Even a quart to just seal my bathroom. But no one had it. I could order on Amazon or a 2 pack off Home Depot. I really wanted a Matte finish- but I also am the girl who loves a bit of a sheen so I can see if it’s clean. Just love me. I also knew that a little bit of sheen would give way as it wears- this will allow me to see when it’s needing a bit more protection in the future.
So I went with Satin and ordered from Amazon. The reviews on Amazon were a bit of mixed bag of awesome and then not so awesome. But the reviews on Home Depot- those will carry more weight. I think it’s really important to read reviews. I also think it’s important to understand the truth that user error is real. We like to be right, we like to think we did everything right… but sometimes we mess up. Did they wait the full hour, did they put it on too heavy?? So many variables to written instruction and the way people actually carry out the work.
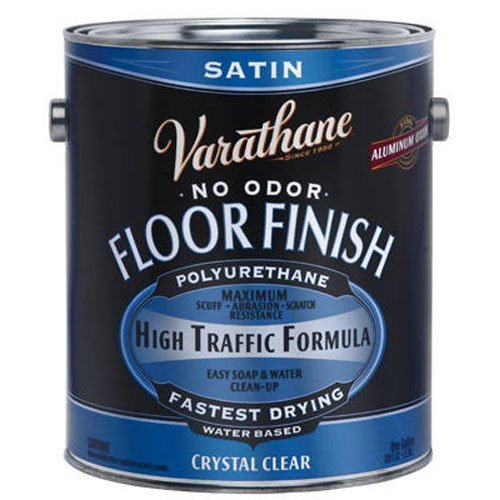
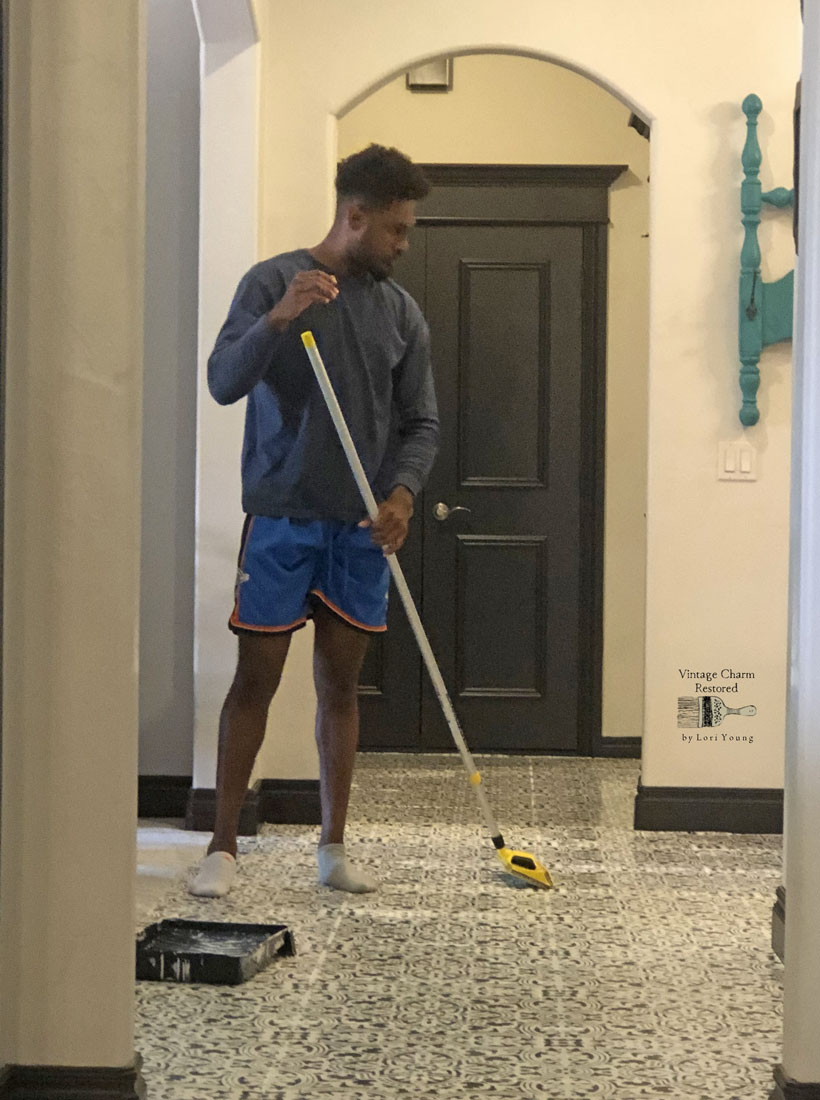
With the Varathane Floor Finish Heavy Traffic Formula (water-based). There is virtually NO ODOR- key for me. I had from end of house to end of house needing to be sealed. I also knew I needed multiple coats. This can be applied with a brush or with a pad. It self levels!!!
I had a left over Woodmates Stain pad that I could attach to my painting pole. I tested it in a small area. This actually worked beautifully. It went on evenly and I couldn’t be happier. My son put on 5 coats while I continued to kill my neck, knees, and back in the kitchen.
It is a (SELF LEVELING) fast drying formula and requires at least one hour between coats. There was no sanding between coats. Durability does go up with each coat. I am sure you max out at some point.
And cleaning is easy. Again, we are in Oklahoma and it’s the Red Dirt capital and I have little and big feet attached to children and dogs… and a little water and a rag has cleaned it up and no stickiness after.
It’s smooth to walk on and not sticky. It’s protected and I sure hope it lasts a long time.
Now that You’re All Done
All that’s left is to clean up the mess you created while working on such a big project!! I can’t help with that!!
I had a big one to clean up!! And I still have my mudroom and laundry room to do!! When school starts!! It’s too hard to keep that many feet off the floors!! It might actually be the hardest part of the job!!
I sure hope you enjoy my floors like I do!!
I cannot believe the transformation it had made in this house. It brightened up everything!! And pulled all my paint colors and decisions I previously made together.
But most importantly, I love it. And didn’t have to add to the landfill or break my budget to have something I would love so much!!
See you soon!! Lori


Lori, wow! I don’t think I could have spent that much time on the floor. This is awesome! It adds so much to the rooms! I am so glad you have felt well enough to do this. You rock, Lady!
[…] of my favorite places. It’s sparse. It’s always clean. And those floors. You can click here to read more. Below, is what used to be my husband’s office. It worked well for most purposes. […]